Tools: Reports and Exporting
In the Tools Module: Tools/Reports Page, you will find various Reports on the left hand side. Data backups are found on the right hand side towards the bottom of the page.
Reports
Member Information
Information pertaining to your Members such as Emergency Contact, Relationships, and more.

- Rosters
- Export a CSV or PDF file of your Roster lists by selecting your Ensemble/Group and clicking "Run" then "Print", "Print (no Pictures)", or "Extract" (Ex. shown below of an extract)

- Add members to this Ensemble/Group by clicking "Add People"
- Copy your ensemble into another year by clicking "Clone This Ensemble"

- Export a CSV or PDF file of your Roster lists by selecting your Ensemble/Group and clicking "Run" then "Print", "Print (no Pictures)", or "Extract" (Ex. shown below of an extract)
- Students by grade level
- Export a CSV or PDF file of all of your active Students' Grade Levels, or narrow down by "Grade Level" in the dropdown, and click "Filter", then "Print" or "Extract (CSV)" (Ex. shown below of an extract)

- Update Grade Levels that need to be adjusted

- *(Tip: be sure to consult this Report before starting the Promotion process)
- Export a CSV or PDF file of all of your active Students' Grade Levels, or narrow down by "Grade Level" in the dropdown, and click "Filter", then "Print" or "Extract (CSV)" (Ex. shown below of an extract)
- Students with no grade level assigned
- Export a CSV or PDF file of all students who are missing Grade Level assignments by clicking "Print", or "Extract (CSV)" (Ex. shown below of an extract)

- See who still needs to have a Grade Level assigned

- *(Tip: you will need to have Grade Levels assigned to your Students in order to complete the Promote End of Year Process)
- Export a CSV or PDF file of all students who are missing Grade Level assignments by clicking "Print", or "Extract (CSV)" (Ex. shown below of an extract)
- People without a program participation record
- *Note: to be considered an active Student in the Current year, they must have a program participation record. Use this Report to assign one to any Members who are missing an Ensemble/ Group and Position
- Export a CSV or PDF file of all Students who are have never been added to an Ensemble/Group by clicking "Run" then "Print", or "Extract (CSV)" (Ex. shown below of an extract)

- *(Tip: This Report is a great resource to consult when you have Student/Members that don't immediately appear in the People Module: Members page default filtering by Ensemble/Group: "include all ensembles/groups"

- *(Tip: this is also where Students who had been Promoted from another Cut Time Account will appear. So if there is another campus within your District that moved up Students - middle school to high school, or needed to transfer students - this Report can be used to place your newly added Members into their corresponding Ensembles/Groups)
- Emergency Information
- Export a CSV or PDF file of your Members' Emergency Contacts by clicking "Run" then "Print", or "Extract (CSV)" (Ex. shown below of an extract)


- Export a CSV or PDF file of your Members' Emergency Contacts by clicking "Run" then "Print", or "Extract (CSV)" (Ex. shown below of an extract)
- Parents/Guardians
- Export a CSV or PDF file of your Members' Parents/Guardians by clicking "Run" then "Print", or "Extract (CSV)" (Ex. shown below of an extract)
- Narrow down by Group/Ensemble, or even search for Parents from another Academic Year


- Relationship Management
- This is where you can Update/Establish Relationship Links for your Members

- Export a CSV or PDF file of your Members' Relationship Links, and narrow down your search by:
- All Students
- All Parents
- Students Without a Relationship
- Parents Without a Relationship
- Ensemble/Group
- Year
- Last Name
 And then click "Run" then "Print", or "Extract (CSV)" (Ex. shown below of an extract)
- This is where you can Update/Establish Relationship Links for your Members
- Volunteers
- *Note: This is also a redirect link to the Volunteers page found in the People Module.
- Export a CSV or PDF file of your Volunteers, and what Volunteer activities they have participated in by clicking "Run" then "Print", or "Extract (CSV)" (Ex. shown below of an extract)


- Donors and Donations
- Export a CSV or PDF file of your Donors and past Donations by clicking "Run" then "Print", "Extract (CSV)",
"Mailing list (CSV)" (Ex. shown below of an extract)


- Total amount of Donations will appear at the bottom right of the last column
- Export a CSV or PDF file of your Donors and past Donations by clicking "Run" then "Print", "Extract (CSV)",
- Member verification
- Export a CSV or PDF file of the various Members who have Self-Registered, and the Status of their Membership Access Request (Accepted, Reject, or Pending) by choosing a Date range, and clicking "Run" then "Print", "Extract (CSV)", (Ex. shown below of an extract)


- To Accept/Reject any Pending Membership Requests, go to your Administrator Dashboard/Login Landing page by clicking the Cut Time Logo on the top left side of your screen. Scroll down to the yellow notification banner related to Membership Requests
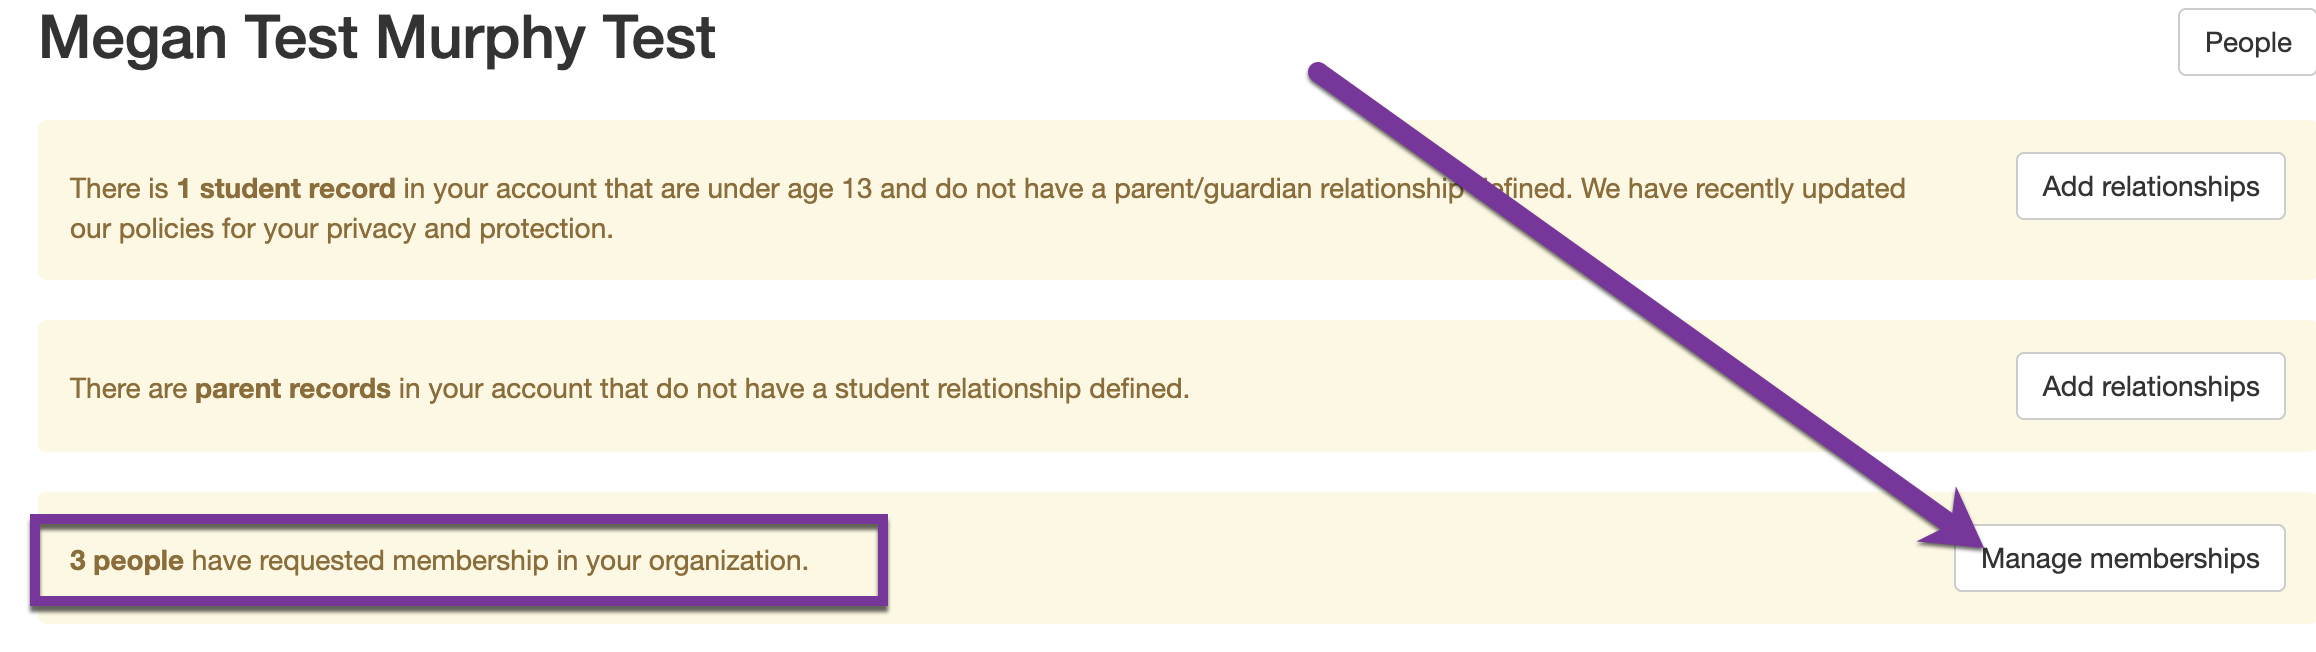
- Then click "Manage Memberships" and click "Approve" or "Decline". For Student Members, select the Ensemble/Group and Position before approving

- *(Tip: Be sure to check the "Possible Duplicate" button to avoid creating a possible duplicate Profile

- Export a CSV or PDF file of the various Members who have Self-Registered, and the Status of their Membership Access Request (Accepted, Reject, or Pending) by choosing a Date range, and clicking "Run" then "Print", "Extract (CSV)", (Ex. shown below of an extract)


 And then click "Run" then "Print", or "Extract (CSV)" (Ex. shown below of an extract)


Cut Time
Find your list of Admins on your Cut Time Account, check who has yet to sign in and send out welcome invitations to your Members' email addresses, or set up Usernames and Passwords.
- Cut Time access rights and permissions
- Export a PDF copy of your Admins and what full or partial Permissions they have been given by clicking "Print" (Ex. shown below of an extract)

- Export a PDF copy of your Admins and what full or partial Permissions they have been given by clicking "Print" (Ex. shown below of an extract)
- Cut Time Sign-Ins
- Choose a Date range and click "Run" then "Print" to export a PDF copy of who has signed into their Cut Time Profiles and the number of times they signed in over time (Ex. shown below of an extract)

- Choose a Date range and click "Run" then "Print" to export a PDF copy of who has signed into their Cut Time Profiles and the number of times they signed in over time (Ex. shown below of an extract)
- Cut Time Audit Log
- See a full history or Financial Actions (such as Recording a Payment or Adding a Member to Financial Obligation) taken over time. Filter down by the Admin who took the Financial Action, Member the Financial Action pertains to, or by the Financial Action taken.

- Click on "View Details" in order to see more information about the Financial Action taken.

- See a full history or Financial Actions (such as Recording a Payment or Adding a Member to Financial Obligation) taken over time. Filter down by the Admin who took the Financial Action, Member the Financial Action pertains to, or by the Financial Action taken.
- Send Cut Time Registration invitation
- Send Member Registration Welcome Invitation Email en mass, or to individuals on this page
 *(Tip: Members with no Email listed will not receive a Welcome Invitation Email)
- Export a PDF file of who still needs to login for the first time by clicking "Print" (Ex. shown below of an extract)

-
Set Cut Time passwords for users
-
If you have entered Student Members into your Account and they have not logged in for the first time yet, you have the option to set a Username and Password for them.
-
Click "Select All" or choose individuals by Name, create a Username and Password for them (or choose to "Set a Default Password"), and click "Save passwords for selected people" (Ex. shown below)
-
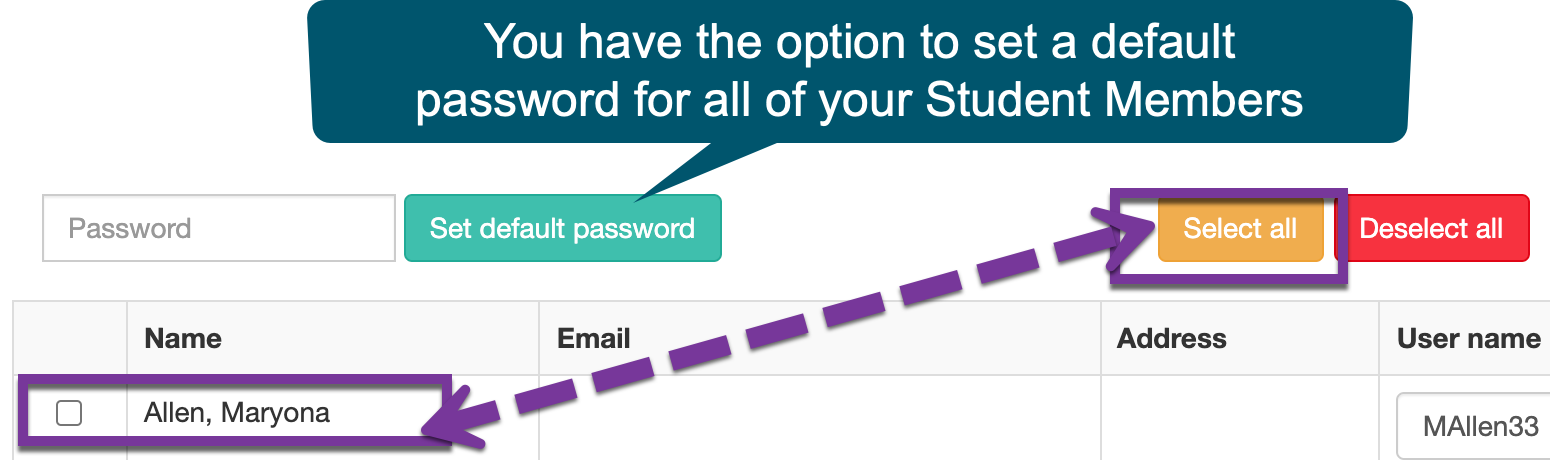
 Please Note*: The system generates suggested Usernames, so make sure the Username that you would like to set for each person is listed correctly before hitting the button
- Additionally*: Once you have clicked the "Save passwords for selected people" button, these members will no longer appear on this page. So make sure to write down or take a screenshot of what Usernames and Passwords you are setting before clicking the button
- *(Tip: Members who have the same Email Address listed, will need to have a unique Username and Password set)


 *(Tip: Members with no Email listed will not receive a Welcome Invitation Email)

 Please Note*: The system generates suggested Usernames, so make sure the Username that you would like to set for each person is listed correctly before hitting the button
Communications
Find reports related to contacting your Members.

- Email addresses
- Extract a PDF or CSV file of your Members' Email Addresses by clicking "Print" or "Extract (CSV)" (Ex. shown below of extract)


- Extract a PDF or CSV file of your Members' Email Addresses by clicking "Print" or "Extract (CSV)" (Ex. shown below of extract)
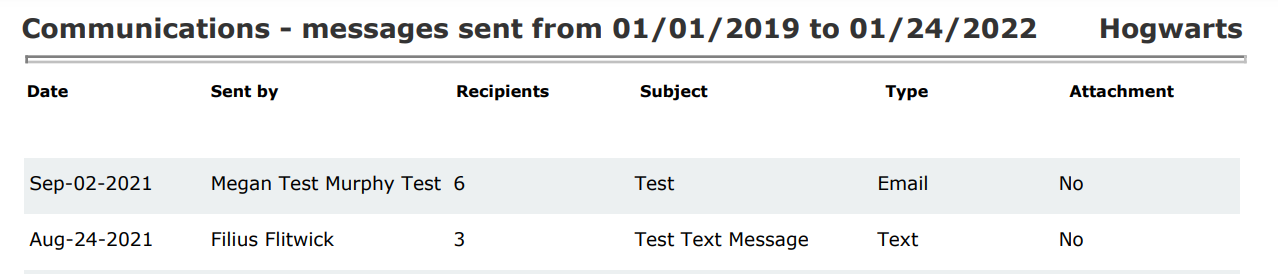
- Email message archive
- Extract a PDF or CSV file of your past Email Messages by clicking "Print" or "Extract (CSV)" (Ex. shown below of extract)

- Extract a PDF or CSV file of your past Email Messages by clicking "Print" or "Extract (CSV)" (Ex. shown below of extract)
- Mobile phones
- Extract a PDF or CSV file of your Members' phone numbers by selecting "All" or a specific Ensemble/Group, then clicking "Print" or "Extract (CSV)" (Ex. shown below of extract)


- Extract a PDF or CSV file of your Members' phone numbers by selecting "All" or a specific Ensemble/Group, then clicking "Print" or "Extract (CSV)" (Ex. shown below of extract)


Calendar
- Events - Attendance
- Extract a PDF file of your Event Attendance by clicking the green Printer Button. Consult linked Help Document for more information.
- Events - RSVP Tracking
- Extract a PDF or CSV file of your Event RSVPs by selecting the Event from the dropdown menu, and clicking "Print" or "Extract (CSV)" (Ex. shown below of extract)


- Extract a PDF or CSV file of your Event RSVPs by selecting the Event from the dropdown menu, and clicking "Print" or "Extract (CSV)" (Ex. shown below of extract)


Financials
Find reports related to your financial data here

- Financial obligations - all
- Extract a PDF or CSV file of all of your Members' Financial Obligations by clicking "Print" or "Extract (CSV)" (Ex. shown below of an extract)


- Extract a PDF or CSV file of all of your Members' Financial Obligations by clicking "Print" or "Extract (CSV)" (Ex. shown below of an extract)
- Financial obligations (by obligation)
- Extract a PDF or CSV file of a Financial Obligation by selecting an Obligation, clicking "Run", then "Print" or "Extract (CSV)" (Ex. shown below of an extract)


- Extract a PDF or CSV file of a Financial Obligation by selecting an Obligation, clicking "Run", then "Print" or "Extract (CSV)" (Ex. shown below of an extract)
- Financial payments
- Narrow down what data you need to pull with the various drop downs and search boxes

- Extract a PDF or CSV file of all of your Financial Payments by clicking "Print" or "Extract (CSV)" (Ex. shown below of an extract)

- Narrow down what data you need to pull with the various drop downs and search boxes
- Financial credits
- Narrow down what data you need by using the various dropdown menus and search boxes

- Extract a PDF or CSV file of all of your Financial Credits by clicking "Print" or "Extract (CSV)" (Ex. shown below of an extract)

- Narrow down what data you need by using the various dropdown menus and search boxes


Inventory
This link will redirect you to the Inventory Module: Instruments/Other Page where you can extract a CSV or PDF file of your Inventory by clicking "Print" or "Extract (CSV)". Consult linked Help Document for more information....

Volunteers
- Volunteer Hours
- Export a CSV or PDF file of Volunteer hours by choosing a Date range, clicking "Search", then "Print" or "Extract (CSV)" (Ex. shown below of an extract)


- Export a CSV or PDF file of Volunteer hours by choosing a Date range, clicking "Search", then "Print" or "Extract (CSV)" (Ex. shown below of an extract)

